Sunday, December 13, 2015

Teacher and Bus Driver Christmas Gift Idea

Teacher Tag

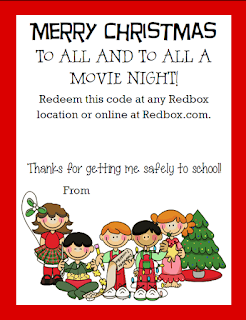
 About this time of year I find myself looking for a gift idea for teachers and bus drivers.  I want it to be something they would both enjoy or appreciate as well as something that won't break the bank.  I ran across this great idea on the Over the Moon blog.  I thought it was brilliant!  Using the basic idea of the tag I created Redbox Gift tags for Teacher's and Bus Drivers.  Combine the tag with a package of microwave popcorn and you have a great gift for around $2.00! 

You can purchase the Redbox Movie codes at the Redbox website.  They can be purchased in bundles of 5, 10, 20 or more.  Once the codes are emailed to you simply write the code on the tag, hook the tag to the popcorn and you're done.  So easy!

Bus Driver / Bus Tech Tag


Sunday, October 11, 2015

Halloween BOO Blocks

As with almost everything in my life, I try to find the easiest way to reach my goal.  For my latest project I wanted to make some a Halloween decoration that wouldn't take all day and would cause very little stress.  This is what I came up with.  It was simple, quick and very little frustration involved. 

Here's how I did it:
First, gather the materials you'll need:
Okay, time to go to work.  Sand your blocks so they are fairly smooth.  Really, the only part that you need really smooth is the side you'll be gluing the paper on.  Afterall, this is a Halloween decoration. Once you've got it smoothed to your satisfaction paint all of the sides.  Yes, I paint the back just to make it look finished and I can put the blocks out anyway I like.  Let these dry thoroughly. 

While they are drying cut out the BOO letters.

Once the blocks are dry and the letters are cut out you're ready to put them together.  Place the letters on the blocks without glue so you'll know where each one goes and you can make sure they're going to fit right. 

When you've got things in order, spray the backs of the letters with the spray glue.  Be generous.  Carefully and fairly quickly rub from top to bottom with your fingers or very lightly with a credit card to make sure all the air bubbles are out.  Once you've done this go around the edges to make sure you get a good seal.  Repeat this with the other 2 letters.  Let these dry for 15-20 minutes.  This is longer than you probably need to let them sit but I like to make sure they're very dry before moving on.

When you're sure they're dry, using your sponge dauber and your black ink go around the edge of the letters to give it an old, used look.  You don't need a lot, just enough to  help the letters blend in with the paint on the block.

I then took the sandpaper and went around the corners and a bit on each of the sides.  Again, this was to give it a worn, old look. 

Finally, to finish the blocks off I tied a ribbon around each of the blocks.  This is the ribbon I chose but you could use what ever you wanted.  This is where the only frustration came in for me because I'm not a ribbon tier.  It probably took me as long to tie these bows as it did for the whole project!


Happy Halloween!

Wednesday, October 7, 2015

Bear Claws Made Easier

While preparing for the Bear Claw adventure, a required adventure for the Bear Rank, I came across some great resources that I wanted to pass on. This adventure is all about pocketknives and there are few things that Cub Scouts like better than pocketknives.  This will definitely be of the more popular adventures. 

The first was found on the Cub Scout Ideas blog.  Here you can find information on three different types of pocketknives (Requirement #1).  You can download a graphic that allows the boys to make play knives with paper and brads. Brilliant!

You can see more of the resources I found on the article I wrote for The Boy Scout.
 Click here for the full article.


Monday, September 21, 2015

A Must-Have Cub Scout Leader Resource


Dr. Nisha Zoeller has made Cub Scout Leader’s life so much easier! For more than 10 years I’ve been a Bear Den Leader with the same Wolf Leader.  We serve as each other’s 2nd leader for 2 deep leadership.  Since the new Cub Scout Program came out we haven’t done a lot of meetings together because the programs are so different, by design.  Dr. Zoeller has changed this.  She has gone through each of the Cub Scout Adventure Requirements from Tiger to Webelos and created a resource that shows all the requirements for each age group for a specific topic.  For example, if you want to do an Aquatics event for multiple age groups you can look on page 4 and see that there are 7 Tiger adventures dealing with Aquatics, 6 for Wolf, 9 for Bear and 10 for Webelos.  It’s wonderful!!  She has done this for 15 different themes.  Planning day camps and other events for Cub Scouts has just gotten a lot easier!  Thanks Dr. Zoeller for all your work!   Click here to download.

Sunday, August 30, 2015

Fall Blocks

clip_image001When I'm trying to be creative I picture how I want the project turn out in my mind.  Sometimes the final product isn't quite what I hoped it would be.  This is the case with these blocks.  I think they turned out okay but not great.  If I were to make these again I would make the letters stand out more.  These kind of blend in with the background.  (This is also a poor picture). 

clip_image003I made the blocks out of scrap 2x4s I picked up at a construction site.  You’d be amazed at how much good wood is available if you're willing to do some dumpster diving.

Here are the steps:
 · Using a 2x4 cut 4 blocks 5.5 inches long each
· Sand the blocks to a smooth finish
· Paint the blocks with Americana Burnt Orange Acrylic Paint (or whatever color you choose)
· Print out the letter blocks on white cardstock (download the file here)
· Cut the letter blocks out and attach them to the painted blocks using spray adhesive
· Sand around the edges to give it a worn look.

It’s that easy!  

Autumn Banner Made Easy

I love having the ability to print out something on the computer and easily turn it into a cute decoration.  Such is the case with these letters made by The Cottage Market.  Let me be clear I did not make these letters, they were made by The Cottage Market.  I simply took Andrea's creative genius and made it a little easier for anyone looking for a super easy autumn banner. 

 
To make this you have two choices: 1- go to The Cottage Market website and download all the letters or you can download the file here that was taken from The Cottage Market website and created a pdf spelling out Welcome Fall.
 
Once you have the letters, I simply cut them out and then strung them on a piece of jute with tiny clothes pins.  It was simple!


Tuesday, August 25, 2015

Cub Scout Bear Necessities Weather Tracker

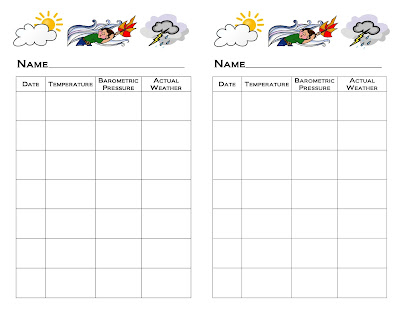
Today I have Cub Scouts and we're working on Bear Necessities #9.  I searched the internet in hopes of finding a chart to send home with the boys to keep track of various weather readings for the next 7 days.  I wasn't able to find one so I made this one.  I'll add it here in case anyone else can use it.
https://drive.google.com/open?id=0BztQQzm-PkjaME1nLW9iT1ZhTEk

Saturday, August 15, 2015

My Son Is Home From His Mission!

My son Nicholas recently returned from the El Salvador Santa Ana Mission.  I can't tell you how great it is to have him home.  To help him feel welcome I created a few things to show how excited we were to have him back. 
The first thing I created were these Welcome Home Tags I put on the door.  I got my idea from  TaggedWithLove1 but then added my own flair.  To cut out the tags I used 1/4 inch MDF board (you can get this at any hardware/lumber store.  It comes in various sizes.)   MDF is super easy to cut so I was able to do it on a table saw (especially since it was all straight cuts).  Once I had the tags cut I drilled a 1/2 inch hole in each for the ribbons. 
It's hard to see but I used a light cream color as the base color and then used black to outline each tag with a floating technique (It's been a long time since I painted!) Basically, you want darker paint on the outside and lighter and lighter towards the middle till it disappears completely.  Not too difficult to learn. 

Once the paint was dry I used my Cricut to cut out the lettering.  After this it was just a matter of putting it together.  I chose to glue the pieces together to hold them in position.  The ribbon was folded in half with the loop end going through the drilled holes then the ribbon ends put through the loop.  From here I tied a simple bow and used a wreath  hanger to hang it on my door.  I added sticky pads (the type you put on the legs of chairs so they don't scratch the wood floors) on the back of the project so it didn't ding up my door and also keep the banging sound to a minimum when the door is opened and closed.  Overall, it was a simple and inexpensive craft. 
 
The next thing I made was a Returned with Honor garland for our fireplace.  There are lots of tie patterns online or you can make your own.  (I used one that I didn't realize was copyrighted so I won't include it here for that reason - oops!)  Once I had a pattern I went to my local scrapbook store and found some fun cardstock prints.  It was a matter of cutting them out from here and adding a letter to each tie to complete the wording.  I used my Cricut to make the letters out of cardstock which I glued on with a glue stick. Vinyl letters would work well also.  I used jute as my string and duct tape to attach the ties.  I'm sure there are a lot of more creative ways to attach the ties but I was going for simplicity here.
 
Finally, the last thing I made was a Mission Accomplished Poster.  I found the graphic at this website (I looked and looked for a copyright and didn't find one so I'm hoping it's okay to include the site here.  Why re-invent the wheel, right?) Anyway, I copied the image, pasted it in a document, got it to the size I wanted and then sent it off to the printer.  It was so easy! (FYI - mine was ledger size 11 x14.  It did come out a little pixelated but was fine unless you looked at it really close.)
 
Having a son or daughter serve a mission has been  a wonderful blessing both for our missionary and our family at home.  It's even better to welcome him home and get that magical hug at the airport.  I hope Nicholas knows how much we missed him and how grateful we are to have him home. 


Monday, August 3, 2015

Cub Scout Binder Labels

I'm back from camp and ready to get organized.  One of the first things I needed to do was put my new Cub Scout manuals away.  To do this I wanted to create binder spine labels so I could easily tell the books apart.  I've uploaded the template here if anyone would find them useful. Click here to down load the pdf file.


https://drive.google.com/open?id=0BztQQzm-PkjaUXhGX1l1UHg1S1U

Tuesday, March 24, 2015

Secret Agent Blue and Gold Banquet


Our Blue and Gold banquet this year was a lot of fun.  Everyone had a blast (even the leaders)!  Here's what we did.  I'll attach the Reader's Digest version here.

Invitations
Two weeks ahead of time we had a "secret agent" stop by and deliver the invitations  to our denner.  He was taken back to say the least.  It was fun to watch.  I think his eyes doubled in size!  We had one of the boys from our troop dressed in a suit with sunglasses and a Fedora.  This picture is very similar to what our secret agent looked like.  Having him stop by really got our boys excited for the banquet.


Decorations
For our table centerpieces we made briefcases with Top Secret signs on each side.  The briefcases were made of cereal boxes spray painted black.  The handles were also made out of cardboard and hooked on with brads. 

The only other decorations was bright yellow caution tape which we had all over the room.  This was the first thing the boys noticed when they walked in.  It really added to the ambiance.   

A fun tradition our pack has done for years is make a placemat wordsearch with all the boys names.  This is a great way to keep kids busy while you're taking care of those last minute details.  You can make these very easily at: puzzlemaker.com

One final prep item was preparing a playlist of  "spy" music to play in the background when the boys and their families arrived.  Songs included: Pink Panther theme, James Bond theme, Mission Impossible and a few others.

The Big Night Arrives
When guests arrived they were given a mustache to aid with their disguise, a spy name and secret agent badge.  To make the badges I used 8163 size labels, an excel spreadsheet and mail merged them.  Super easy! Once they picked their name we had them put their thumb print on the badge. 

For dinner we had sloppy joes, chips, vegetables and dip.  For dessert we made chocolate cupcakes with chocolate frosting and a red shoe string piece of licorice to make it look like a bomb.  I'm not sure the kids could tell what they were but enjoyed them nonetheless.

Awards were presented to the Scouts by Sherlock Holmes who pulled them out of his top secret briefcase. 

Activities
Following the awards we played a fun family game called Bring It On.  This is a great game that can be played almost anywhere and with almost any age.  Items needed: 
  • rectangle banquet type table set up at the front of the room
  • list of items to Bring It On
  • an announcer (the person that tells the families what to bring up)
  • at least a couple of judges
Playing is really simple (another plus).  The announcer gives the family the names of 1 or 2 items to bring to the table.  We divided the audience into 2 teams. The first team to get the item(s) to the table gets the point.  Very easy.  The key is to pick general items that someone in the room will most likely have such as a article of clothing with a college name, something round, something you can read.  Encourage creativity such as if you say a picture of a man it doesn't have to be an actual picture, it could be a cell phone picture, a dollar bill, quarter or anything along these lines that have a picture of a man. If you say something green, it could be someone's green eyes, a jacket, bead, piece of candy or anything else you can think of that's green.  It's nice to play a practice round to make sure everyone is on the same page.  We ended up playing for about 20 minutes.  It could have gone longer but we wanted to end while people were having fun.  It helps to give them warning that you're wrapping up, "Ok, 5 more rounds."  I think people loved this game because all ages got involved. 

Another game we played that began when the boys walked in was Spy.  Some may know this game by the name Assassin.  We chose to call it Spy and instead of "killing" people we had them reveal the spy they've been assigned.  When the boys walked in they chose a name from a basket.  Once the opening ceremony was over everyone was free game, meaning spies could be revealed.  To reveal a spy the boys had to get near enough to their target to tap them on the shoulder twice.  If they were tapped this meant they had been exposed and are now out of the game.  The revealed spy would then give the revealer the name they were targeting.  The spy then goes after this spy.  If it all works out right it will come down to two spies and then ultimately a final "Master Spy".  It was fun to watch the boys be so paranoid and worried about anyone getting close to them.  Some thought we should let all the kids play and not just the Scouts.  Due to the varying ages and understanding levels we ended keeping it to just the Scouts but had the families be the body guards to protect their secret agent.   

Everything was set up, carried out and taken down in less than 3 hours. This theme was nice because everything was so easy, boys loved pretending to be spies and the whole family was able to get involved. 

Your mission should you choose to accept it is....do this with your Pack!

Friday, March 20, 2015

Giving Back

I wear lots of hats including, Mom, wife, employee, Camp Director, Cub Scout Den Leader, Order of the Arrow Advisor, Relief Society Homemaking Leader and a few more I won't bore you with.  I love Pinterest!  I get a tons of ideas there.  I'm starting this blog as a way to give back.  Occasionally, I have a light bulb moment and think I should share this.   My posts will likely be few and far between and probably pretty random, so you'll never know what's coming.  Here goes!

Marble Madness Pack Night


A couple of nights ago we had a Pack Night where the theme was Marble Madness.  It was great fun for all involved.  Here's what we did.

We started off with our pre-opener making marble art.  It's so simple.  It can be done in lots of different ways.  We chose to keep it really simple.  Start out with cardboard flats from your local grocery story.  Put in a piece of regular copy paper  2-3 marbles (it's fun if one is a shooter) and 2-3 colors of acrylic paint (you can get this at any craft store).  Simply drop 1 dime size drop of each color on the sheet of paper.  It doesn't really matter where you drop the paint.  It often looks easier to spread the paint and cover the white if they're spread out in a triangle shape.  Have the artist tilt the box to roll the marbles through the paint to spread it around and mix the colors.  Once they're done set it aside to dry (takes about 15-20 minutes.)

We don't do much singing but opted to share a song we had just learned at our district Cub Scout Belt Loop Camp.  It's called Oh, I Wish I Were - sung to the tune of "If You're Happy and You Know It".  Here are the words:

Oh I wish I were a little hunk of mud, (HUNK OF MUD) - echo
Oh I wish I were a little hunk of mud, (HUNK OF MUD)
I'd be ooey, ooey, gooey
Under everybody's shoey,
Oh I wish I were a little hunk of mud. (HUNK OF MUD)

Oh I wish I were a little stripe –ed skunk, (STRIPE – ED SKUNK)
I'd sit up in the treezies
And perfume all the breezies
Oh I wish I were a little stripe –ed skunk, (STRIPE – ED SKUNK)

Oh I wish I were a little bar of soap, (BAR OF SOAP)
I’d go slippy, slippy,  slidey
Over Everybody's Hidey
Oh I wish I were a little bar of soap, (BAR OF SOAP)
Oh I wish I was a little radio (radio)
I’d turn off with a click

For our activity we broke up into 3 areas which rotated between every 10 minutes:
  • Marble Racers
  • Ringer - A Marble Game
  • Marble Alley
Marble Racers
I've attached the pattern for these. They need to be copied on cardstock.  The secret to making these is to keep the sides straight.  The marble has to be able to move back and forth for it to tumble.  Again, we kept this really simple.  We  had the patterns cut out so we the youth would have lots of time to race.  We used a 8 foot banquet table with one leg folded down covered with a sheet for our ramp.  (The sheet provides just enough friction to keep it from sliding straight down).  The kids folded their own and then glued them with a glue stick (liquid works okay but often bubbles the paper and takes a while to dry).  Once they're dry (about 1 minute) go over and race away.  We just had a free-for-all but organized races would have been fun as well.
If you're racer is working correctly it should go down the ramp like the illustration shows.  If it doesn't it's likely one of these reasons: 1 - not enough friction or 2 - the marble doesn't move freely inside the casing. Kids of all ages get a kick out of seeing something so simple work.

Ringer - A Marble Game
Ringer is probably the most well known marble game.  Sadly, kids these days don't play marbles like they used to.  (I have actually not ever played marbles except for Cub Scouts either).  Due to our time constraints we played a simplified version of the game.  It also helped that we had been working on the new Cub Scout Marble Adventure for several weeks so the boys had some idea how to shoot their marbles.   Here are the rules for the game:
  1. Draw a ring (a large circle – usually about 5 to 10 feet across) and put 13 marbles in it . The marbles should be in a cross and spaced 3 inches apart.
  2. Each player shoots in turn from outside the circle, trying to hit a marble out of the ring while keeping his shooter inside the ring.
  3. If the shooter has a miss, his turn is over and he picks up the shooter.
  4. If the shooter has a hit but the shooter also rolls out of the ring, he keeps the marbles that rolled out and his turn is over.
  5. If the shooter has a hit and the shooter stays in the ring then player shoots again from the place where the shooter stayed.
  6. On each new turn a player shoots from anywhere outside the ring.
  7. The person who collects the most marbles is the winner.
Marble Alley
For this game we used blankets and towels to make a perimeter (so we didn't have marble
 everywhere).  Inside the boundary we put all sorts of things that the youth could try and hit when they shot their marble.  Each item had a point value.  The youth had to decide if they wanted to go for items that were close but low in point value or go for a difficult target that would get lots of points.

To finish off the night we closed with a Cubmaster's minute (How to Treat People - see below) that went along with the core value - Compassion.  We then gave the youth a Good Turn coin and explained how it worked.  We challenged the youth to put the coin in their right pocket.  At some point they would do a good turn and move their coin to their left pocket.  Each night they should place it on their dresser and start over the next morning putting the coin in their right pocket. 

What would a Pack Night be without refreshments?  Since our Pack Night was held on St. Patrick's Day we served Chocolate Mint ice cream.  Our other idea was doughnut holes.

Here's a few links so you don't have to re-invent the wheel:
Happy Scouting!
 

St. Patrick's Day Printable

It's hard to find St. Patrick's Day decorations so when I ran across this quote I knew I had to make it into a printable.  This is formatted to 8.5 X 11 size paper.  Enjoy!